
- Blog
Forming Precision Keeps Fluctuating? A Complete Troubleshooting Guide
- By tian81259@gmail.com
If your lead forming results are “good one hour, bad the next,” you’re usually dealing with a stability problem—not a “precision” problem. Precision is what a machine can do; stability is what it does all day.
This guide helps you isolate the root cause fast, then lock in consistent cut length, lead pitch, and bend angle—without guessing.
Internal links you may want handy:
- Lead forming machine overview: Lead Forming Machine (https://flourishe.net/manual-lead-forming-machine/)
- Selection/Buying guide: Lead Formers Buying Guide (https://flourishe.net/lead-former-buying-guide/)
What “Precision Fluctuation” Usually Looks Like
Common symptoms you’ll see on the line:
- Cut length drifts (long/short alternating, or slowly creeping)
- Pitch shifts (holes don’t line up with PCB, insertion becomes tight)
- Bend angle changes (too open / too tight, inconsistent seating)
- Intermittent burrs (sometimes clean, sometimes rough)
- One cavity good, one cavity bad (multi-cavity dies)
These patterns matter—because the pattern often points to the cause.
Before You Touch the Machine: Confirm Measurement Is Real
A shocking number of “precision problems” are measurement problems.
Do this first (5 minutes):
- Use the same caliper/gauge, same operator, same method (measure at the same datum each time).
- Sample 10 parts in a row from the same station.
- Record cut length / pitch / angle separately (don’t lump into “bad”).
If the variation is random across all dimensions, suspect feeding or component variability. If it’s one dimension only (e.g., cut length only), suspect tooling alignment or wear.
Quick Diagnosis Flow
Use this quick logic to avoid chasing the wrong area:
A) Alternating good/bad (every other part, or frequent toggling)
Most likely:
- Loose fasteners / die not clamped
- Play in guide rails or indexing mechanism
- Feeder “double-feed / half-seat”
- Sensor bounce or inconsistent trigger
B) Gradual drift (gets worse over time)
Most likely:
- Tooling wear / edge rounding
- Heat expansion affecting clearance
- Lubrication breakdown / dust buildup
- Air pressure slowly dropping under load
C) One side / one cavity out of spec
Most likely:
- Die parallelism issue
- Uneven wear (one station doing more work)
- Component lead skew during clamping
Step 1: Check the Component Itself (The “Hidden” Root Cause)
If incoming parts vary, your forming result will vary no matter how good the machine is.
Inspect these incoming variables:
- Lead diameter tolerance
- Lead plating hardness / material batch changes
- Pre-bend / lead skew from previous process
- Packaging style (bulk vs tape vs tube) and how consistently it presents the part
Fast test: run the same settings with a known-good batch (or a small “golden sample” batch).
If stability returns, your issue is upstream.
Step 2: Feeding & Positioning (Most Common Cause of “Random” Variation)
Precision dies can’t fix inconsistent positioning.
What to inspect:
- Feed track vibration: too strong = bouncing; too weak = incomplete seating
- Stopper/locator wear: rounded edges cause micro-shifts
- Guide width: too wide allows yaw; too tight causes drag
- Tape pitch / sprocket match (tape-fed): mismatch creates periodic errors
Tell-tale sign: you see occasional “almost correct” parts—off by a tiny, inconsistent amount.
Fixes that usually work:
- Reduce vibration amplitude and increase consistency (stable frequency > brute force).
- Replace or re-square the stopper/locator.
- Add a simple pre-alignment guide (low-cost, high impact).
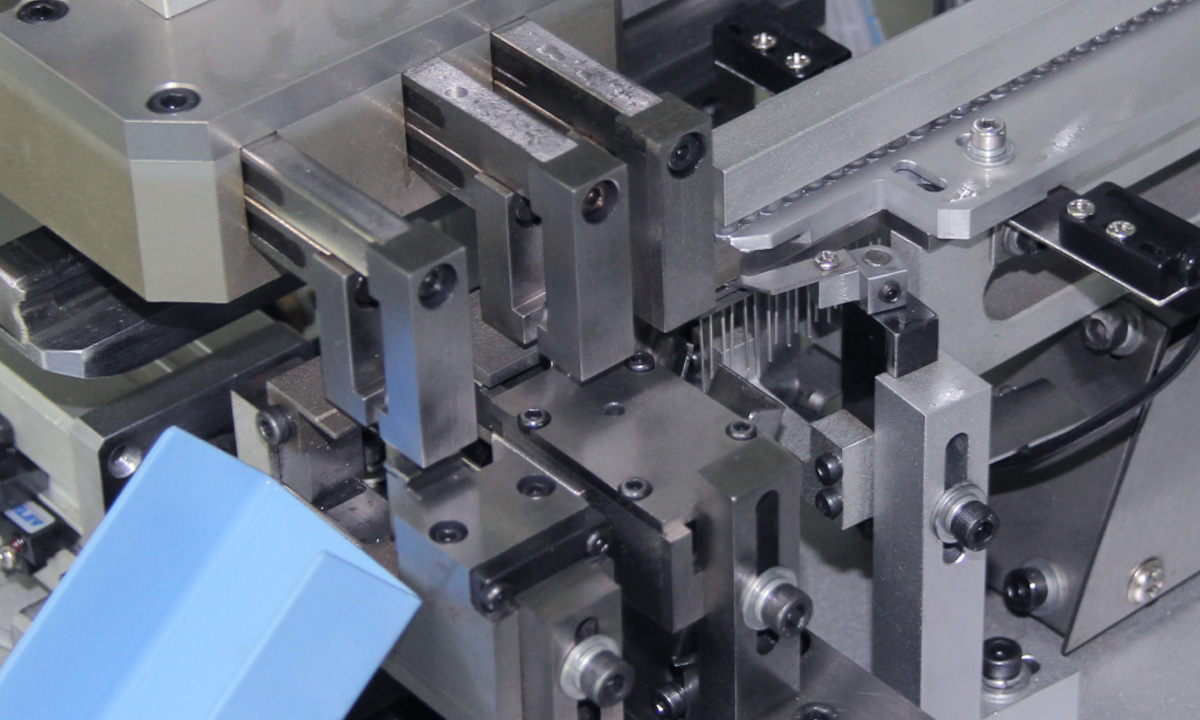
Step 3: Tooling (Die/Blade) Wear, Clearance, and Parallelism
If your variation is mostly in cut length or burr quality, go straight here.
What to look for
- Cutting edge rounding, chips, or micro-cracks
- Uneven wear on left vs right blade
- Die faces not parallel (one side forms earlier than the other)
- Tooling screws backing out over time
Simple confirmation test
- Mark your die position with a paint pen.
- Run 100–200 pcs.
- If the mark shifts or clamping pressure changes, you’ve found a mechanical stability issue.
Common fixes
- Re-grind/replace blades (don’t “tune around” a dull tool).
- Re-seat tooling and torque fasteners consistently.
- Verify parallelism using feeler gauges or dial indicator if available.
Step 4: Drive System Stability (Pneumatic vs Servo)
Pneumatic systems
Precision can fluctuate with:
- Air pressure variation
- Moisture in the line
- Regulator drift
- Valve response inconsistency
Quick checks:
- Confirm pressure at the machine while cycling, not just static.
- Drain water trap; verify FRL condition.
- Check for leaks (listen + soap test).
Servo/mechanical systems
Variation can come from:
- Backlash in linkage
- Loose coupling
- Position feedback instability
- Parameter changes after maintenance
Quick checks:
- Inspect couplings and set screws.
- Check if the “bad” parts correlate with speed changes or load spikes.
Step 5: Sensors & Timing (When Errors Look “Weird”)
If the process is triggered by sensors, timing jitter can create sporadic defects.
Inspect:
- Photoelectric sensor alignment (dust on lens = intermittent detect)
- Proximity sensor mounting tightness
- Cable shielding / electrical noise near VFD/servo cables
- PLC input debounce settings (if available)
Tell-tale sign: variation becomes worse at higher speed or when nearby equipment turns on/off.
Step 6: Setup Parameters That Create “False Precision”
Even with perfect hardware, these settings can create variation:
- Clamp force too low → part shifts during forming
- Clamp force too high → lead deforms unpredictably
- Forming speed too fast → springback increases variation
- Wrong reference datum during setup (operator-to-operator differences)
Best practice: document a “golden setup”:
- Tooling position reference
- Clamp force/pressure
- Feed settings
- Speed
- First-article measurement record
This turns troubleshooting from “memory” into a repeatable procedure.
Step 7: Environment & Maintenance (The Slow Killers)
If the machine starts stable each day and degrades later:
- Dust/lead scraps build up in slides and stops
- Lubrication thins out or gets contaminated
- Temperature changes alter clearances
Low-effort wins:
- Add a mid-shift cleaning point (5 minutes).
- Create a simple “daily check” list: pressure, sensor lens wipe, scrap removal, clamp check.
A Practical “Fix Order” That Saves Time
When you’re under production pressure, fix in this order:
- Feeding/positioning (most “random” issues)
- Tooling condition & clamping (most “cut/burr” issues)
- Air pressure/FRL (pneumatic drift)
- Sensors/timing (intermittent weirdness)
- Drive/structure wear (if it persists after the above)
FAQ (Snippet-Friendly)
Why does lead forming accuracy change after switching to a new component batch?
Because lead diameter, hardness, plating, or packaging presentation can shift the way parts seat and spring back—changing pitch/angle even if the machine settings didn’t change.
What causes cut length to be sometimes long and sometimes short?
Usually inconsistent seating against a stopper, a loose die, or blade wear—plus timing issues if a sensor triggers the cut inconsistently.
Pneumatic forming looks stable at first, then drifts—why?
Air pressure under load can sag, moisture can affect valves, and regulators can drift. Always check pressure while the machine is cycling, not at rest.
Next Step: Match the Right Machine to Your Tolerance Target
If your production needs tighter consistency (or frequent changeovers), machine selection matters as much as troubleshooting. Use this guide to choose the right type and configuration for your process:
Lead Formers Buying Guide → https://flourishe.net/lead-former-buying-guide/
And if you want a quick reference on lead forming equipment and applications:
Lead Forming Machine → https://flourishe.net/manual-lead-forming-machine/
Share the Post:
Related Posts
20 Years of Expertise, Trusted by Clients Worldwide
The Preferred Choice of Foxconn, BYD, and Huawei