
Bending resistor leads is an essential step in the assembly of electronic components, especially in the manufacturing of printed circuit boards (PCBs). Proper lead bending ensures resistors are securely attached, ensuring the overall circuit’s functionality and reliability. This article explores the best methods for bending resistor leads, with a strong emphasis on the use of resistor lead forming machines for automated and efficient production.
Why Proper Lead Bending Matters
Incorrectly bent leads can lead to poor fitting and unreliable electrical connections, which can compromise the overall integrity of the PCB. Ensuring that leads are bent accurately improves the quality of the circuit, increases the reliability of the components, and enhances the assembly process’s efficiency.
Key Benefits of Proper Lead Bending:
Enhanced Circuit Reliability: Secure resistor placement ensures solid electrical connections.
Improved Efficiency: Automated processes like lead forming reduce manual labor and production time.
Reduced Risk of Damage: Accurate bending prevents resistor damage and increases component lifespan.
Consistency in Production: Automated systems provide uniform lead shapes for large-scale production.
Tools for Bending Resistor Leads
To ensure proper bending, using the right tools is essential. Below are the most commonly used tools for bending resistor leads:
1. Pliers:
If only a few components need to be bent, pliers can be used. However, precision may be more challenging to achieve with pliers compared to specialized tools or automated machines. It is crucial to ensure that the bend is clean and uniform.
2. Semi-automatic lead-bending tools:

These tools are designed for bending leads to precise angles. They achieve consistent bends, which is especially important when working with small components like tape-type resistors.
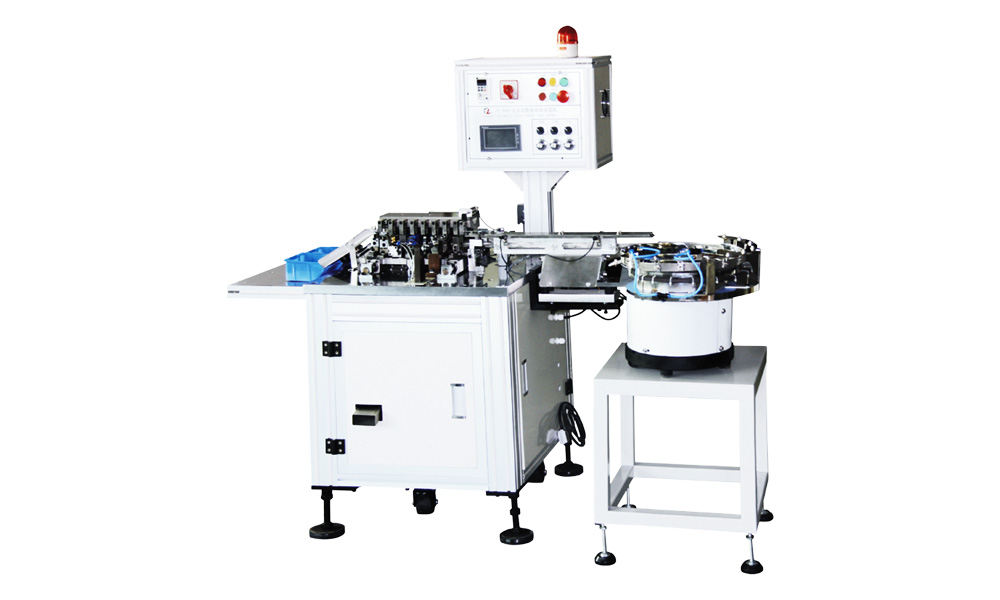
3. Automated Lead Forming Machines:
For large-scale production, automated lead forming machines are a great option. These machines provide high precision and speed, making them ideal for mass production. Automated machines can bend resistor leads at exact angles without requiring manual intervention, ensuring consistency across large batches.
4. Lead Cutting and Bending Machines:
These machines can simultaneously cut and bend resistor leads, offering an efficient solution for high-volume production. They provide precise control over lead length and bending angle, contributing to consistent results.
A step-by-step guide to bending resistor leads using pliers
To bend resistor leads correctly, follow this step-by-step guide:
1. Prepare the Resistor
Before bending, ensure the resistor is free of any debris or contaminants. This ensures the leads are clean and free from any potential interference when connecting to the PCB.
2. Select the Right Tool
Choose the tool that suits your production scale. If you’re working on a small number of resistors, pliers or Semi-automatic lead-bending tools might be sufficient. For larger-scale production, consider an automated lead forming machine for consistency and efficiency.
3. Measure the Required Bend Angle
The bend angle depends on the type of resistor and the layout of the PCB. Typically, resistor leads are bent at a 90-degree angle to facilitate proper insertion into the board. Use a ruler or a guide on your bending tool to ensure the correct angle.
4. Position the Resistor Lead
Place the resistor lead into the bending tool or between the jaws of pliers. Ensure that the lead is aligned with the tool to achieve a precise bend.
5. Make the Bend
Apply pressure to bend the lead gently. Be careful not to exert too much force, as this can cause the resistor to break. Aim for a clean, consistent bend, and check the angle for accuracy.
6. Trim Excess Lead Length (If Necessary)
Once the lead is bent, trim the excess length using wire cutters. The trimmed lead should have enough length to securely connect to the PCB while avoiding unnecessary overhang.
7. Inspect the Bending
After bending, inspect the resistor’s lead to ensure it has the correct shape, angle, and length. A proper bend should allow the resistor to sit securely on the PCB without being too tight or too loose.
Step-by-Step Guide to Bending Resistor Leads Using Lead Forming Machines
1. Prepare the Resistor
Ensure the resistors are sorted and clean. For bulk resistors, they should be placed into a vibration feeder or bowl to be automatically fed into the lead forming machine. For tape-type resistors, place them in the machine’s tape holder.
2. Set Up the Lead Forming Machine
For bulk resistors, ensure that the vibration feeder is set up to provide smooth and reliable feeding. For taped resistors, load the tape into the machine’s feeder system.
Machine Settings: Adjust the lead forming machine’s settings based on the type of resistor (bulk or tape) and the required lead bend angle. The machine is programmed to bend the leads precisely according to the pre-configured mold shapes.
3. Adjust the Molding Parameters
Cutting and Bending Molds: The lead forming machine uses molds that can be adjusted to the desired lead bending angle. You can set the machine to bend the leads at the correct angle, typically 90 degrees, or other angles depending on the product’s specifications.
Precision: These molds ensure that every resistor lead is bent uniformly, preventing inconsistencies and ensuring that the resistors fit securely on the PCB.
4. Run the Lead Forming Machine
Once the setup is complete, run the machine. The resistors will be automatically fed into the machine, realizing cutting and bending processing.
5. Quality Control and After the Bending Process
The product resistor components are bagged and sent to the production line, and the defective components are picked out and discarded to avoid affecting subsequent production.
Best Practices for Resistor Lead Bending
Use the Right Bend Radius: Ensure that the bending tool allows for a clean curve in the lead, preventing damage to the component.
Avoid Overbending: Overbending can lead to stress on the resistor lead, increasing the risk of breakage. Stick to the required bending angle for optimal performance.
Test the Fit: After bending, test the resistor in the PCB layout to ensure the leads fit correctly in their slots.
Use Consistent Methods: For large-scale production, using automated lead-forming machines ensures that each resistor has a consistent bend and fits uniformly in the PCB.
Conclusion
Bending resistor leads is a delicate but important part of the PCB assembly process. By using the right tools and following the correct steps, you can ensure that the leads are bent with precision, leading to a more efficient and reliable manufacturing process. Whether you are working on a small project or handling large-scale production, maintaining consistency and accuracy in bending resistor leads will result in better circuit board performance and a smoother assembly process.